learning with lacey

I think I’m making progress. I’ve been analyzing other gals’ styles to try to figure out why certain outfits look good. Photos from these three helped me. Blog posts, magazine articles, Polyvore, and co-workers helped me. I’m secretly spying on everyone, wondering how to boil down the concept of proportion into something practical. I’m no Coco Chanel, but I’ve gone from this…

pink lace skirt, lavender rosette top, brown belt & boots, tan cardigan

…to this…

pink lace skirt, blue & white striped top, cardigan, sandals

…and this.

lace skirt and knotted chambray shirt with flats

Neither of these looks is an extreme makeover; I get that.  But I think subtle changes often make a dramatic difference because I can stick to them.

Right now I’m getting to know my proportions.  That process is  helping me discover what works–sometimes through trial and error, I admit.  What I’ve learned from Lacey (the skirt, in case you were confused) is not to fear my “natural waist.”  It feels funny to me to let the bottom half of my clothes cross over onto what I think of as the top half of my body.waist and natural waist
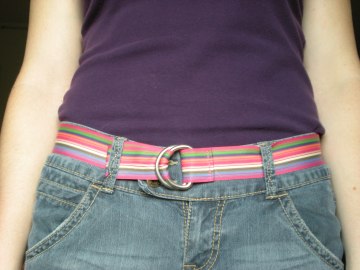
But the whole “halves” concept was part of my problem.  I was breaking my outfits into two chunks a lot of the time.  (See the first photo where the thick belt across my hips draws a heavy line between torso and legs.)

This new insight into my proportions sent me to my closet yet again.  This time I removed everything that, if I’m honest, I have to admit isn’t flattering.  (Then, because I’m a real human and not an honest-to-goodness fashion plate, I put back one pair of sweatpants, one hoodie, and a free T-shirt from the library.  There are those days….)

I’ll save the closet purge for another post.  For now I’d like to know how you direct your own fashion evolution.  Does seeing yourself in photos help you recognize what works?  Do you feel inspired to remix your clothing when you flip through catalogs?  Have you crafted a signature look?  Do tell….

pair of pinks {manicure}

Hey, guys!  With Valentine’s Day fast approaching, I thought it would be fun to follow this morning’s “red” post with a “pink” one.  Here’s my holiday-inspired manicure:

It started out with me trying to decide which color I wanted to use, and in the process of testing “Pink Blink” on my ring finger, I thought, “What if I highlighted my ring finger with one color and did the rest in another color?”

Like it or hate it, I just did for for fun–and I like it!  I think it would be fun to try with other colors.  What I like about this combination is that they’re both subtle so I feel like the overall effect is pretty subtle too.  The colors are “Pink Slip” (Sally Hansen Complete Salon Manicure) and “Pink Blink,” (Sally Hansen Insta-Dri).

One tip before we part: I’ve discovered through many applications of Pink Slip that it actually works best for me when I don’t push back my cuticles.  The polish is very thick, and when I use it on perfectly manicured nails it spills over.  Maybe that’s just because I use too much to get the opaque coverage I prefer?  I don’t know; it’s weird.  Sometimes everything looks perfectly contained, but by the next day the polish has crept over the lines.

Anyway, this time I left my cuticles big and bad and they seem to be keeping the polish on my nails, where it’s supposed to be!  I also recommend putting on 3 or 4 extremely thin coats to get faster drying and avoid the dreaded smudging or, what always happens to me, hair imprints from sleeping with not-quite-dry nails.  So that’s my two cents on holiday nail color.  You still have time to try it!  And if you don’t have very special ring on one of your fingers, mix it up!  Try the odd color out on whatever finger you want.  Have fun!